Free Accounts You Need To Optimize Your Site’s SEO
When you’re just getting started working on your website’s SEO, it can be overwhelming to know where to start! There are thousands of tools, tactics, and resources, but there are a few foundational tools that can help you kickstart and optimize your SEO.The following three tools are free, and are the basis of a strong SEO strategy for all businesses, from smaller local businesses to international e-commerce sites! Whether you are wanting to DIY your SEO or outsource to a service provider, having these tools in place will give you insight into your website’s technical health, keyword opportunities, and on-site behaviour that gives you insight into the SEO opportunities for your site!
Google Analytics
Your website may have some built-in analytics, but Google Analytics is one of the most powerful free analytics tools you can have on your site! Install this as soon as possible - it will only start collecting your website’s data once you have installed the code, and it can’t collect any historical data before then. If you are paying for ads or marketing your business in any way, you have to be looking at your Google Analytics to see if your efforts are really successful, and where to increase your investment or pull back.For SEO, we can measure our organic traffic from different search engines, where people are coming from, what they do on our website, and so much more! Some of the main metrics you can measure for each of your marketing channels include:
Traffic (users and new users)
Behaviour (time on site, pages per session, bounce rate)
Content (Landing pages, exit pages)
Ecommerce metrics (Revenue, transactions, conversion rate)
Goals (custom goals, time on site goals)
Below, I’ve outlined how to install Google Analytics on your site depending on what platform you are using!
Setting Up Google Analytics
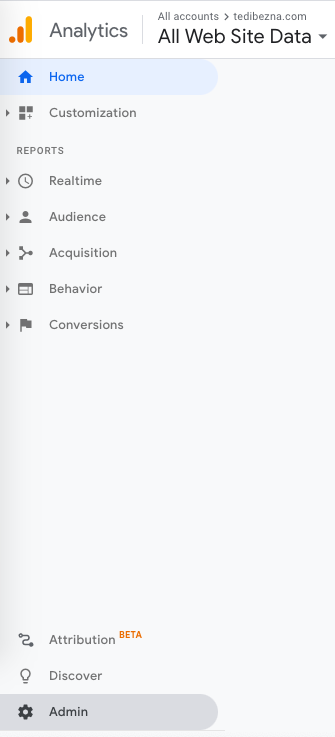
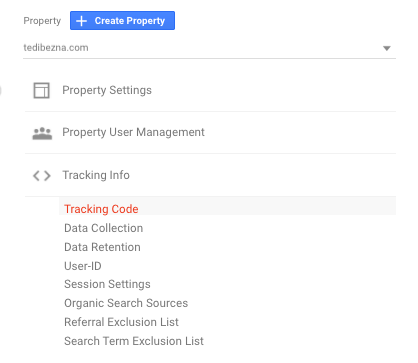
1. Create your Google Analytics site by visiting analytics.google.com2. In the bottom-left corner, select 'Admin'3. Under ‘Property’ select ‘Tracking Info’, and then 'Tracking Code'. Here you should see two options - a UA code, and a universal site tag. Depending on your website platform, you can use either of these to integrate your website. 4. After installing the tracking code to your site (instructions below), verify that it has been installed correctly by going to the ‘Real Time’ report at the top of your left-hand navigation, and see if traffic is being recorded.5. If you have a Google Ads account set up, integrate it by selecting 'Google Ads Linking' under the 'Product Linking' Section of your Property Settings. Select the correct Google Ads account, and hit 'Continue'. Add a name for the Google Ads Account, and select 'On' next to the view you would like to have Google Ads Data in. Select the Data Sharing option under Account Settings. Click 'Link Accounts'.6. In your left-hand navigation, select 'Acquisition', then 'Search Console'. If this has not already been linked, you will be prompted to link these accounts. Ensure that you are logged in to the same Google account for both your Search Console and Google Analytics.
To install Google Analytics on your site:
Wordpress
On your left-hand navigation, select ‘Plugins’ and ‘Add New’
Search for ‘Headers and Footers’, install, and activate the plugin.
Navigate to ‘Headers and Footers’ plugin and add full tracking code to the header section.
Squarespace
In the ‘Home’ menu, select ‘Settings’ and then ‘Advanced’
Select ‘External API Keys’
In the Google Analytics section, paste your UA code, and save.
Shopify
On your left-hand navigation, go to ‘Online Store’ and select ‘Preferences’
In the Google Analytics section, paste your tracking code from Google Analytics
If you already have E-commerce tracking implemented in your Google Analytics, select the ‘Enable Ecommerce’ checkbox.
WIX
Select ‘Marketing Integrations’
Go to Google Analytics and click ‘Connect’
At the top right-hand corner. Clock ‘Connect Google Analytics’
Paste your UA code into the text box. Select ‘IP Anonymization’ to ensure that your Google Analytics data remains anonymous. Hit ‘Save’.
Weebly
Log in to your Weebly account and click ‘Edit Site’
Under ‘Settings’, select ‘SEO’.
Paste full tracking code into the ‘Header Code’ text box, then hit ‘Save’ below and ‘Publish’ in the top right corner for your changes to be implemented.
Google Search Console
Google Search Console is the window between your website and Google, and having this tool set up on your site is critical for understanding how Google sees your website. Having this set up as early as possible is helpful because data will only start to be collected once you verify your account, and any historical data will be lost - so the sooner the better!The reports in Google Search Console show you the exact phrases that are being searched to find and drive traffic to your site. The main metrics that Google Search Console tracks are
Clicks
Impressions
Click-through Rate
Position
You can also dive into your data for these metrics based on
Query (search phrase)
Page
Country
Device
Search Appearance (where on the search result you appeared)
Date
Based on these metrics and the different ways of slicing and dicing your data, you can find opportunities to improve your content by page, keywords, or search behaviour. One of the first opportunities to look for are search phrases with high impressions and low clicks - what can be changed in your page title or meta description to better attract these users to your site?You can also use your Google Search Console account to request new crawling and indexing for your pages, If you’ve made any improvements and optimizations to a page, you can submit it directly to Google to have them look at this new content, and update your rankings accordingly for faster improvement.
How to Set Up Google Search Console
Log in to search.google.com/search-console
Make sure you are logged in to the same Google Account as your Google Analytics profile (you can check in the top right corner of your screen)
Select ‘Search Property’ in the top left corner, then select ‘Add Property’
Add your URL to the URL Prefix verification option
If you have Google Analytics installed already, it should automatically verify you. If not, you have the option of adding a snippet of code to your site’s header.
If your Console account was set up previously, you’ll have access to historical data right away. If not, the information will begin to appear in approximately 3 days.
Google My Business
Having a Google My Business profile for your local business is one of the best ways to promote your business and show up in the search results for free. By making the most of all available features and completing all the available fields, your profile can appear in maps search results, the Local Pack, and your own Knowledge Panel. The insights available in Google My Business will give you an idea of which search terms are leading to your profile, and can help you determine your client’s language, needs, and interests locally to help optimize your site and inform your content strategy.
3 Factors to Google My Business Success
Incorporate your keywords and services to increase your relevancy. Google will try to determine how relevant your business is to a user based on the content of your website and your Google My Business profile, so ensuring your keywords are included in your business description, products/services, and even your reviews!
Add your business’s address or service area to show your proximity to the user. If you have a physical address that you operate your business out of, add this address. You can also include different service areas if you deliver services at people’s homes or remotely.
Encourage your clients to leave reviews, and increase your online citations for authority. Ensuring you have positive reviews and creating additional points of reference for Google to validate the legitimacy of your business online will encourage Google to rank you in the local pack by increasing your authority online.
How to Set Up Your Google My Business Profile
Search your business name on Google. If an account already appears, claim your business. If not, sign in to https://www.google.com/intl/en_ca/business/
The site will walk you through all the stages of setting up your account. Complete all possible fields given your business type, especially address and service area.
Once you complete your initial setup, your profile will go through the verification process, where you will have either a phone call or a postcard mailed to you with a code. Once you receive this code, enter it into your Google My Business profile. Verification allows your profile to be visible, and also allows you to make changes and updates to your profile and have them published.
Do you have all of these tools set up for your website? If not, you could be missing out on important data! If you need help getting started with tracking and measuring your SEO efforts, give us a shout and we’d be happy to help!
Contact us today to book your free 30 minute consultation!


